NSW-DoE Disaster Recovery Function
Preamble
This functionality provides significant benefits
in terms of disaster recovery, security, and file management. This will provide schools the capability to
save their .etz timetable file in the cloud and restore when required. This is not a cloud timetable solution, this function only facilitates saving your file online so if school need to recover any of the previous version files in future. Please refer to our FAQ section at the bottom of this document. This is only available to
NSW Dept. of Education (DoE) schools who will be onboarded to this
functionality as per DoE guidelines. Once a school has been setup with this
functionality, timetable files will only be accessible to registered users who
will need to sign in.
What is required to use this feature?
- Initially, the Disaster Recovery feature is only accessible by NSW DoE
schools.
- This will be only available in the latest version of Edval 10. Edval 9
users have been contacted to migrated to Edval 10.
- Schools that have been onboarded to this function will no longer be
able to use the Edval 9 application.
- Internet access is required to use this feature. Users can continue to
open their timetable if they are offline, but no data will be saved in the
cloud.

This function is only available in the latest version of Edval 10. NSW DoE schools still using Edval 9 have been contacted to migrate to Edval 10.

Users who have been issued an account by the school's admin and are looking to access the timetable file, please refer to Step 4.
How will schools be onboarded?
- Tes will send out a form to schools to nominate the main timetabler for
onboarding.
- A Tes online account for the school will be created. An activation
email will be sent to the nominated user along
with instructions.
- The nominated user will need to activate the account and add additional
users that needing access to the timetable file. Please refere to the steps below.
We recommend only the timetablers and choice administrators having access to the timetable file, if you are having other users accessing the file for student classlist information, enrolment, timetable view/room information please use our Edval Staff application instead that is multi-user platform and used for student enrolment, classlist management, room information, Link here. If users at school only requiring access to view timetable along with room information then you can refer to our online cloud module here
Step 1 - Account and admin user setup
Prior to account setup, Edval will require the school management to nominate an admin user for account setup and activation via an online nomination form. The admin user will be responsible for setting up additional users. Please contact your school's head office if the online nomination form has not yet been submitted.
Once Edval receives the nominated user information, the school account with the admin user will be set up. The admin user will receive the confirmation email as shown in Step 2 :
Step 2 - Admin user email confirmation
The admin user will receive an activation email once the school has been set up. Upon clicking the activation link, the user will be prompted to set up the login password. The activation link is only valid for 2 weeks after the email is received.
If the admin user is also the timetabler or the only user using this function, there is no need to log in to the online account to setup additional users. The user can skip to Step 4 and log in to Edval 10.
Step 3 - Log in to online account to create additional users
Once the admin user clicks on the confirmation link and sets the password, the page will automatically redirect to the login screen where they will enter their email address and the password that has been set. The user will land on the main page and, depending on the school's module access level, will be able to see one or more of the following modules: Admin, Classlist and Help.
- Click on the Admin module to access the User management screen. This screen is used to add additional users requiring access to the timetable file. An additional user can have access to the timetable file only, with the ability to use the disaster recovery function, or they could be given 'Admin' level access, giving them the ability to use the Admin module as well.
- Click on Add user in the top right corner and fill in the Name, Email and Phone Number, click on Add once finished. Alternatively, add the information via the last row in the Users table and click the green tick at the end of the row to finish.
- Once the user is added, additional permissions may be assigned if the user is to have 'Admin' level access.
Once the users have been added, they will receive a confirmation email to set their password. An 'Admin' level user can log in to add or remove users via the Admin module.
It is strongly suggested that school add a 2nd admin user to the account in case of back up.
Step 4 - Logging into Edval 10
4.1. Running the Timetable file
If the etz timetable file is already associated with the Edval10.exe, clicking on timetable file will open the file and the login screen will be displayed, as mentioned in point 4.2 below. Similarly, dragging the etz file and dropping it over Edval10.exe, will display the login screen.
Clicking the Edval10.exe directly, when running the application for the first time, will display the option shown below. Select Open local file and locate the timetable file, which, when opened, will display the login screen.
4.2. Login
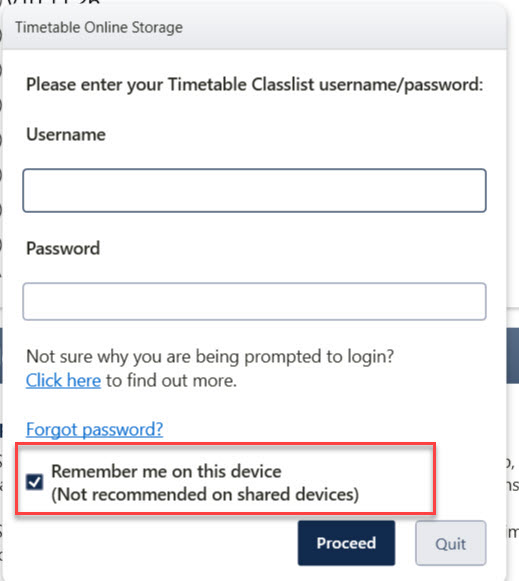
When opening the timetable file, a login dialog will be displayed. Enter the login details that have been previously created.
Tick 'Remember me on this device' only if it is not a shared device. This option will remember the login details every time the timetable file is opened. If required, click 'Forgot password' to reset the password. Click Proceed when the username and password have been entered. A 'Cloud login successful' pop up message will appear in the bottom left corner. The user's name and a logout button will be displayed in the Menu panel on the left.
4.3. Saving a disaster recovery checkpoint to the online cloud storage
Disaster recovery will save a copy of the timetable file to the online storage everytime the file is saved, The file can be saved either by using the shortcut "Ctrl+S" or clicking on the Save icon at top right section or go to File>Save . A pop up message, Saving disaster recovery checkpoint will appear for a few seconds everytime the file is saved.
Schools will need to make sure to regularly save their timetable file so they are back up in our restore checkpoint. As mentioned in our FAQ section, each saved file will only be kept for 3 months in our disaster recovery server and will be discarded after automatically. Primary schools that are not using their timetable file often and may only need it at start of the year will need to make sure to open their file regularly within the 3 months timeframe to ensure it is saved online.
4.4. Accessing disaster recovery checkpoints
To access disaster recovery checkpoints, go to File > Restore disaster recovery.
Disaster recovery will override an existing checkpoint if one exists that matches all 5 attributes (user, file name, academic year, rotation, date saved). If no matching checkpoints exist, a new checkpoint will be created.
Click the 'Open' button to open a read-only copy of the file. Editable copies of this file can be made via File > Save as.
Please refer to the step below for other methods to restore your timetable file.
4.5. How to recover a file from the online disaster recovery storage
There are multiple ways of restoring the data from the disaster recovery storage.
- Open any of your old copy of timetable file and go to File > Restore disaster recovery. Any versions from the table can be opened.
- If all Edval files stored locally have been lost and no other timetable files or copies can be located, contact Edval support who will assist you with restoring the latest saved version from the online server.
- If the computer/network server that stores the Edval files have been completely wiped due to an incident, simply download the Edval10 executable and run the application. The application will display the option shown below. Click on Restore disaster recovery checkpoint to open the login page and enter login details. This will open the latest saved copy of the timetable file as read only. Use File > Save as to open the editable copy of the file.
Please contact the license team at edval-license@tes.com to download the latest copy of Edval10.exe
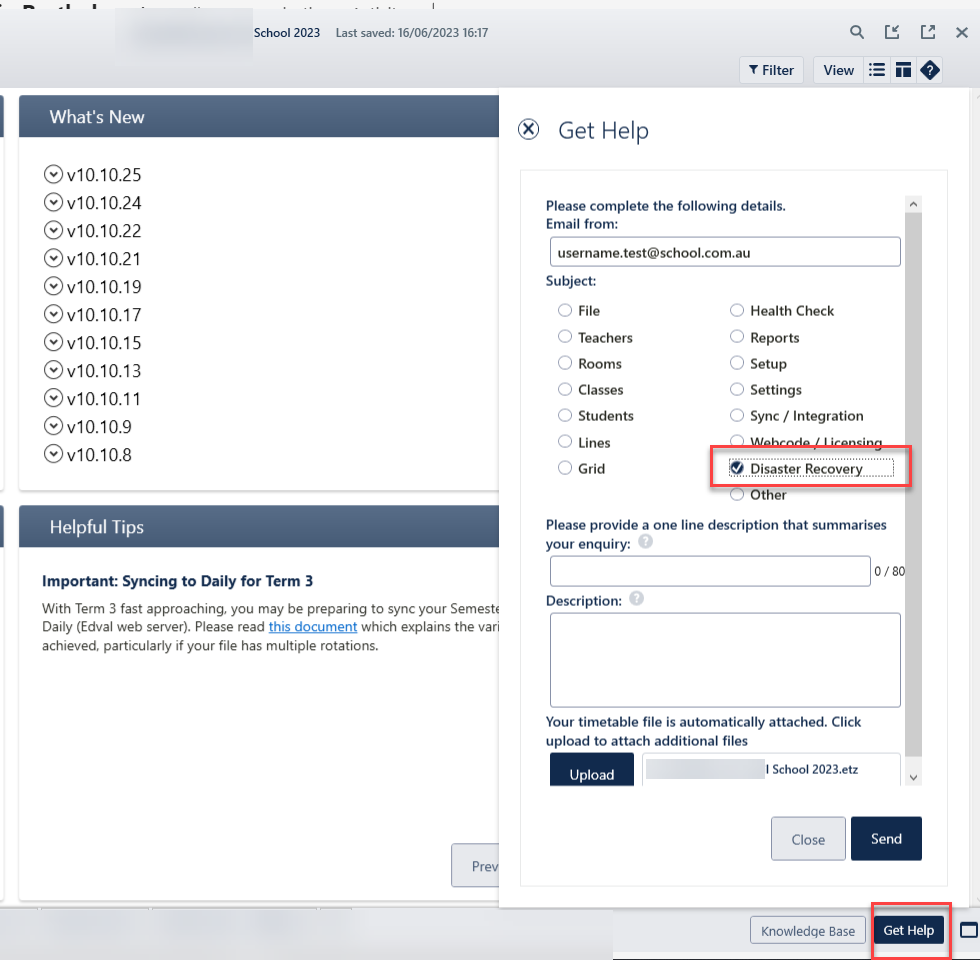
Getting Help
If further assistance is required, submit your query through 'Get Help' in Edval 10. Select Disaster Recovery and fill in the rest of the details. Email us at edval-timetable.support@tes.com with the email subject Disaster Recovery if unable to access 'Get Help' in Edval 10.
Frequently Asked Questions
What should I do if my login fails?
A: If the login isn't working, try the 'forgot password' option. If still unsuccessful, check with your school's admin person.
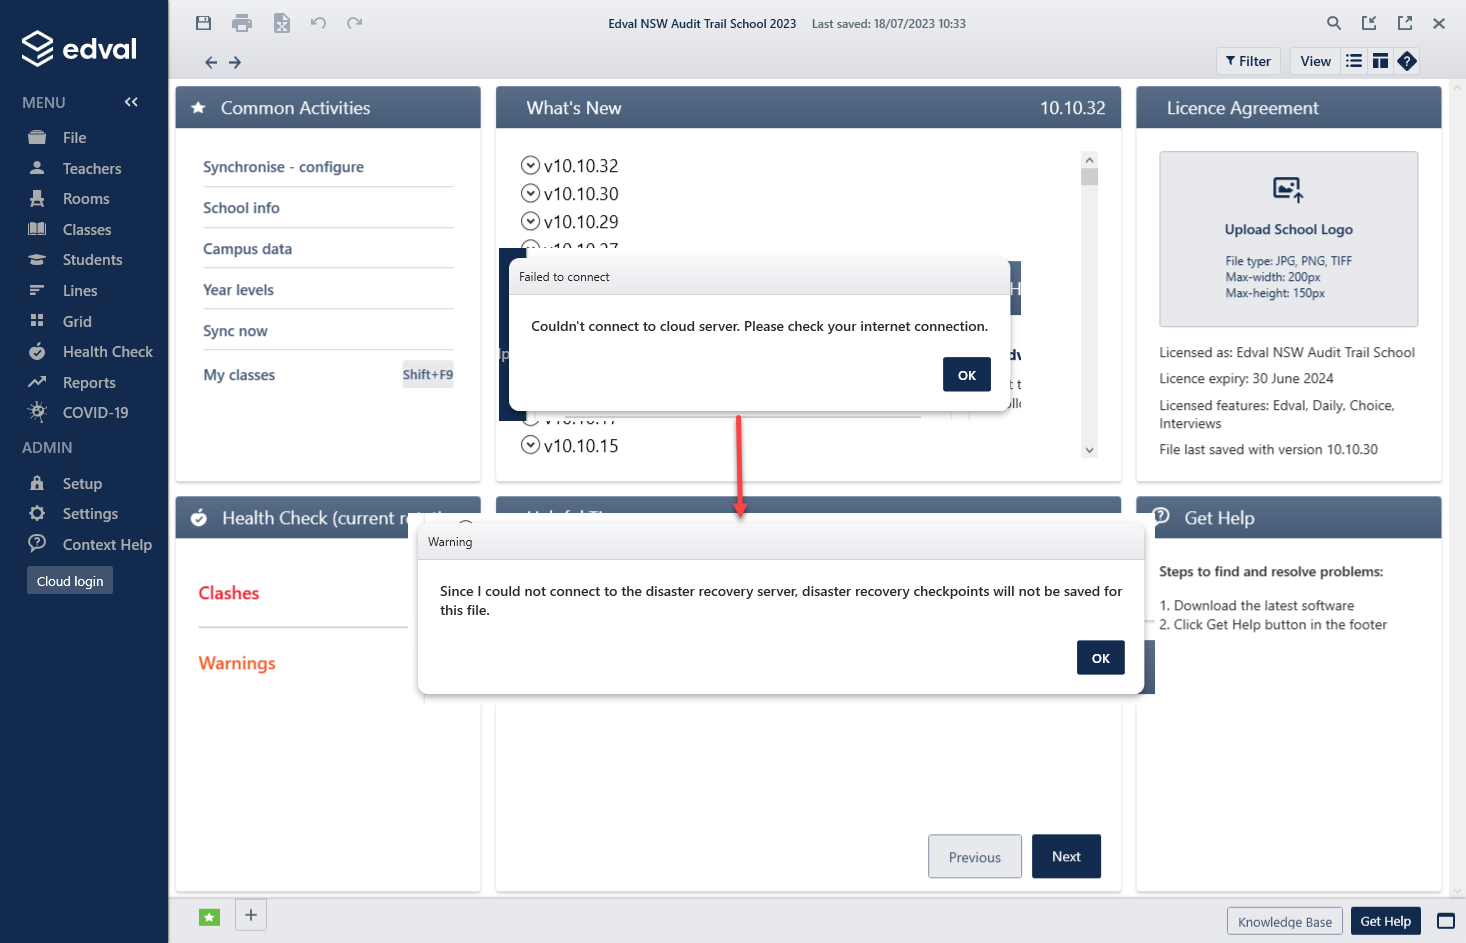
Can I still open my timetable file if I am offline?
A: The file will try to connect to the server when opened and if it fails then you will get the pop up warning but can still continue using your file but no data will be saved online. You will ge the following message:
Can a single user be part of multiple seperate school accounts?
A: No, single email address can only be associated with one account. Users that are part of multiple seperate schools will need to pick school's generic email address to associate with the 2nd account.
A: No, single email address can only be associated with one account. Users that are part of multiple seperate schools will need to pick school's generic email address to associate with the 2nd account.
If you use the same email account accross two licenses then you will get below error in one of the timtable file when you login to Disaster Recovery.

If a school is multi-file, would they have two seperate online accounts or would it be one single account?
A: Multi-file school will have one online account where multiple administrators can be setup so each admins handle the specific school file.
Does the disaster recovery function upload a separate copy of the same file online each time you save the file or does it overwrite and keep the last saved version?
A: Disaster recovery will override an existing checkpoint if one exists that matches all 5 attributes (user, file name, academic year, rotation, date saved). Otherwise it will create a new checkpoint.
Does the auto-save function save a disaster recovery checkpoint as well as a local Autobak?
A: It creates both an autobak and a disaster recovery checkpoint.
How long does the cloud storage keep my copies of my timetable file?
A: The cloud storage keep each copy of the saved file up to 3 months online for users to restore it.
Can I access my cloud storage via the browser and check my saved files?
A: No, The cloud storage is a backend server that only upload the files. You will only be able to check and restore your copies of files through Edval Timetable > File > Restore Data Recovery as mentioned in above step 4.4.
How do I restore my file if I have lost all copies of my file locally?
A: Please refer to our above Step 4.5, in particular to the point 2 and 3
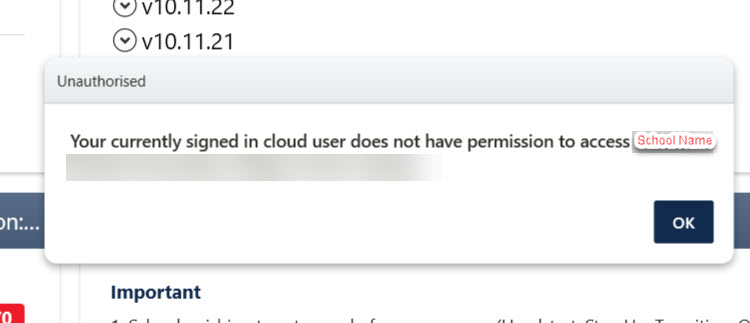
How does the "Remember me on this device" works?
A: Ticking the option will remember your login in your machine/laptop registery and wont ask for the login next time when you open the timetable, as long it is accessed from the same machine. You can have multiple copies of the same school timetable and ticking it on one copy will remember it for all copies. If you are accessing the timetable for two different two schools then the login will only be remembered for the 1st school and upon opening the 2nd school you will get the below error message.
A: Ticking the option will remember your login in your machine/laptop registery and wont ask for the login next time when you open the timetable, as long it is accessed from the same machine. You can have multiple copies of the same school timetable and ticking it on one copy will remember it for all copies. If you are accessing the timetable for two different two schools then the login will only be remembered for the 1st school and upon opening the 2nd school you will get the below error message.
Related Articles
E10 - Edval Staff: Introduction and set up
Preamble This document is designed to provide an overview of the purpose, set up and use of Edval Staff. It will refer users to other Knowledge Base documentation for detailed guides. Edval Staff is an excellent multi-user collaborative desktop ...